How to Screen Record on Mac: Everything You Need to Know in 2024
If you need to explain something new in macOS Ventura or share an interesting clip with friends, screen recording on your Mac is a straightforward solution. The advantage of macOS is that it has had integrated screen recording for years, and Apple has continually improved and streamlined the process with each Mac operating system update.
Methods to Screen Record on Mac–

This guide will cover all the methods you can employ to screen record on Mac. To make things simple, let’s begin with a discussion of the built-in screen recording methods, and also explore some third-party applications you can use for Mac screen recording.
How to Screen Record on Mac
There are two primary ways to screen record on Mac, both leading to the same tool for capturing your screen. Here are both options:
Using the Screenshot and Recording Toolbar (Command + Shift + 5)

- Press Command + Shift + 5 to open the screenshot utilities toolbar.
- Within the screenshot utilities toolbar, select the screen recording option. You can choose to record the entire screen or a specific portion.
- Once your choice is made, click ‘Record’ to commence screen recording.
Using QuickTime Player for Screen Recording

How to End Screen Recording
While your Mac’s screen is being recorded, it’s essential to know how to stop the recording when you’re finished. To do this:
- When the screen recording is in progress, you’ll notice an icon in your Mac’s menu bar.
Recording Audio with Your Mac Screen
Recording System Audio
Unfortunately, the native Mac screen recorder can’t capture system audio. It only provides options for using your Mac’s microphone as the audio source for screen recordings. To record your Mac’s system audio, follow these steps with a third-party application:

- Download and install “Loopback” (available as a free download).
- Note: To use Loopback, you’ll need to allow the installation of system extensions on your Mac, involving a simple setting change accessible from your Mac’s recovery screen, with instructions provided when you first launch the Loopback app.
- Launch Loopback and create a ‘New Virtual Device.’
- Add an audio source by clicking on the ‘plus’ icon next to ‘sources’ and select the application you want to record. In this example, we’re using Microsoft Edge as the app.
- You can rename the virtual device as you like, but the default “Loopback Audio” is sufficient.
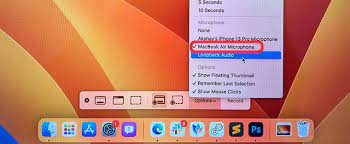
- Now, open the screenshot utilities toolbar by pressing Command + Shift + 5 and click ‘Options.’
- In the screen recording settings, select ‘Loopback Audio’ (or the name of your virtual device) as the microphone source. This will allow you to record audio playing within the selected apps configured in Loopback.

Recording with Mic Audio
If you prefer to use your Mac’s microphone to add audio while screen recording, follow these steps. This can be useful for creating video tutorials or providing commentary:
- Open the screenshot utilities toolbar by pressing Command + Shift + 5 and click ‘Options.’
- In the screen recording settings, select your Mac’s microphone as the audio source.
Using Your iPhone as a Mic for Screen Recording
If you want even higher-quality audio for your screen recordings, you can use your iPhone as a microphone. It’s a straightforward process:
- Open the screenshot utilities toolbar by pressing Command + Shift + 5 and click ‘Options.’
- Select your iPhone’s microphone as the audio source.
<strong>How do I open the screen recording tool?</strong>
There are two main ways:Shortcut: Press Shift + Command + 5 simultaneously. This opens the Screenshot tool, and the screen recording options are right there.Launchpad: Go to Launchpad, choose “Other,” and then click “Screenshot.”
<strong>What can I record?</strong>
You can record your entire screen, a specific window or portion of the screen, or even your webcam and microphone audio.
<strong>Can I record audio along with my screen recording?</strong>
Yes, you can record audio along with your screen recording by selecting the desired audio input source before starting the recording in QuickTime Player or adjusting audio settings in third-party screen recording applications.
<strong>Are there any third-party screen recording apps available for Mac?</strong>
Yes, there are several third-party screen recording apps available for Mac, such as ScreenFlow, Camtasia, and OBS Studio. These apps offer additional features and customization options for screen recording.
<strong><strong>Where are screen recordings saved on Mac?</strong></strong>
Screen recordings captured with QuickTime Player are saved to the location you specify when saving the recording. You can choose the destination folder before starting the recording.
<strong>How do I stop a screen recording on Mac?</strong>
To stop a screen recording on Mac using QuickTime Player, click on the “Stop” button in the menu bar or the recording controls. The recording will then be saved to your specified location.
<strong>What file format are screen recordings saved in on a Mac?</strong>
Screen recordings on a Mac are typically saved in the .mov file format by default. However, you can export the recordings to other formats using QuickTime Player or third-party video editing software.
<strong>Can I customize screen recording settings on a Mac?</strong>
Yes, you can customize screen recording settings on a Mac using the built-in screen recording tool or third-party applications. You can adjust settings such as video resolution, frame rate, audio input, and recording duration.
<strong>Where do screen recordings save on a Mac?</strong>
By default, screen recordings save to your desktop. You can change the save location by clicking on “Options” in the Screenshot toolbar and selecting a different save location under “Save to.”
<strong>Can I record audio along with the screen recording?</strong>
Yes, you can choose to record audio from your microphone or system audio along with the screen recording.


