DAL1
DAL1 SJ0
SJ0 HOU0
HOU0 MIN0
MIN0 SKC1
SKC1 ATX1
ATX1 COL0
COL0 VAN0
VAN0 RSL1
RSL1 STL0
STL0 UAE
UAE NED
NED PAK
PAK ENG
ENG IND-W
IND-W ZIM-W
ZIM-W GMB
GMB LES
LES MOZ
MOZ ZMB
ZMB Inter Milan
 Fiorentina
 Churchill
 Punjab FC
 NGA
NGA UGA
UGA MEX-W23 (9.3/20 ov, target 189)
 ARG-W188/5
 ATM1
ATM1 DEP0
DEP0 LAZ2
LAZ2 PAR1
PAR1 RCL2
RCL2 PAR1
PAR1 NZ-A317
 IND-A113 & 10/2 (4.4 ov)
 SYL
SYL KHU
KHU MYMS299/4 (87 ov)
 CHATT
CHATT DHA293/3 (84.1 ov)
 RAJ
RAJ RAN320/5 (80 ov)
 BAR
BAR DEN
DEN PNG
PNG NAM321/6
 IRE290 (47.3/50 ov, target 322)
 WEL1
WEL1 CCM0
CCM0 Athletic
 Getafe
 C Palace
 Newcastle
 Hull
Hull Brentford
 Liverpool
 Brighton
 Man United
 Bournemouth
 Atalanta
 Frosinone
 RIY2
RIY2 TAA1
TAA1 CHE0
CHE0 TOT2
TOT2 VAL1
VAL1 VIL2
VIL2
Editing a video with a messy or distracting background can ruin the entire visual impact, especially when the subject looks out of place. This common challenge makes finding the right green screen video editor essential for clean and professional results. With Chroma Key technology, backgrounds can be removed and replaced seamlessly, transforming ordinary clips into polished visuals.
Modern green screen video editor offer faster processing, smarter AI features, and easier controls. This guide explores how to use Filmora for Chroma Key editing, helping create high-quality green screen videos with minimal effort and maximum precision.
Part 1. Remove Green Screen From Video: How Filmora Handles It
Filmora simplifies green screen editing by combining an intuitive design with powerful Chroma Key capabilities. It enables quick background removal, allowing editors to replace green screens with custom images or videos in just a few steps. This streamlined approach makes it suitable for both beginners and professionals aiming for efficient results.
Beyond basic functionality, the video editor for PC provides detailed adjustment options such as edge smoothing, color correction, and spill control to enhance visual accuracy. These features help create cleaner subject isolation and more realistic composites. Additionally, an AI-driven Chroma Key video editor improves overall video quality while reducing manual effort.
Coherent Features Offered by Filmora
- Edge Feather and Thickness Adjustment: Controls the smoothness and border width around the subject for cleaner and more natural-looking cutouts.
- Color Picker for Background: Selects the exact green tone from the video to ensure accurate and complete background removal.
- Keyframes for Isolation: Applies changes at different points in the timeline to improve subject separation and create dynamic adjustments.
- Save Settings as Presets: Stores customized chroma key configurations for reuse, saving time and maintaining consistent editing results.
Part 2. Chroma Key Video Editor in Filmora: Step-by-Step Workflow
Once the basics are understood, the next step is learning how to practically remove green screens from video using Filmora’s built-in chroma key workflow. The step-by-step process below shows how to use Filmora for isolating objects from a green screen:
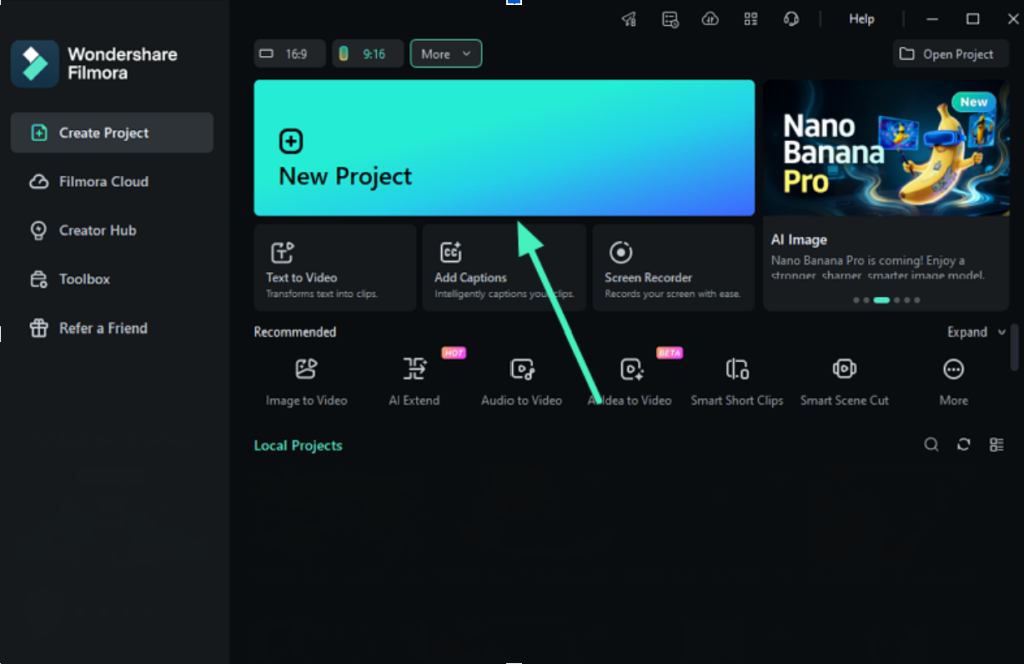
Step 1. Start Creating a New Project
Start by launching Filmora and choosing the “New Project” option from the home screen. After that, import the green screen video into the media panel and drag it onto the timeline.
Step 2. Apply Chroma Key Feature
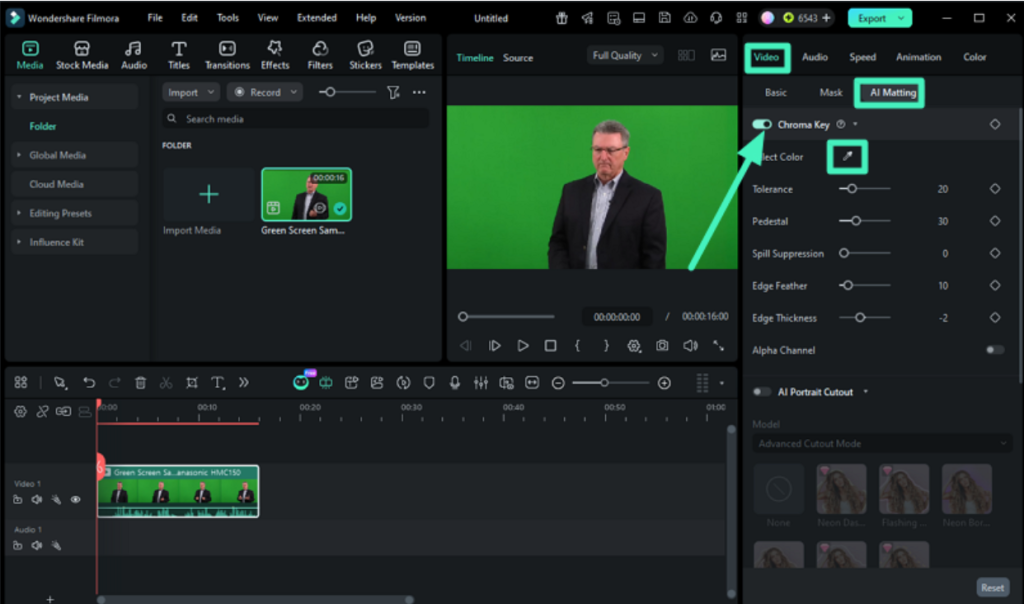
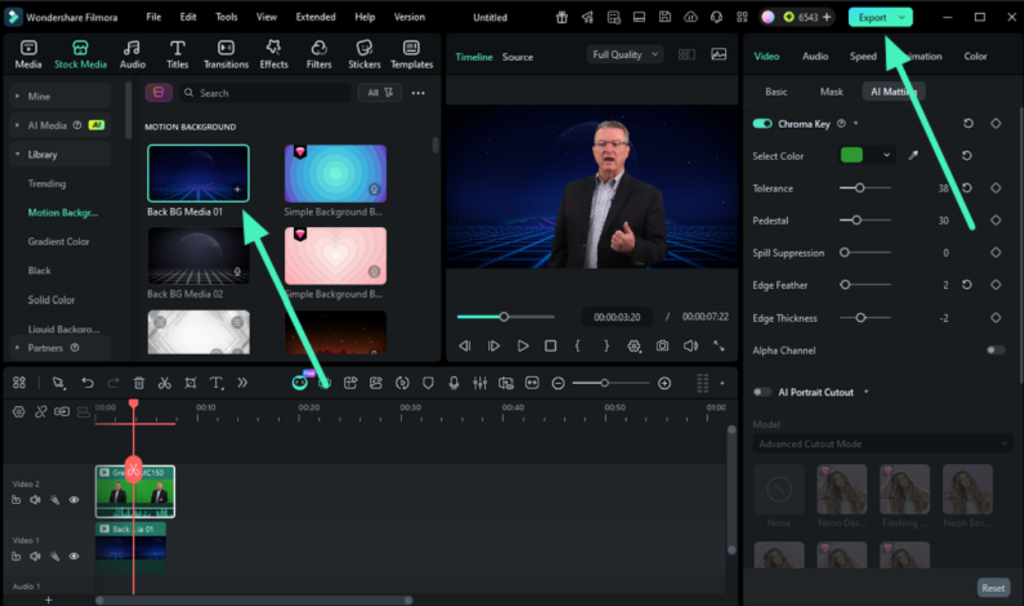
Once the clip is added, open the properties panel on the right and turn on “AI Matting” under the “Video” section. Then activate the “Chrome Key” option. Select the “Color Picker” and click on the green area in the preview window to remove the background instantly.
Step 3. Replace Background If Required and Save
After background removal, insert a new backdrop by uploading an image or choosing one from the stock media library. Make any final adjustments to improve visual quality. When everything looks ready, press the “Export” button to save the completed video.
Part 3. Edit with Green Screen Use Cases in Filmora
After the basics and workflow are clear, it becomes easier to understand how creators actually edit with green screen in real projects using Filmora. This flexibility makes Chroma Key editing useful across many creative and professional scenarios.
- YouTube Content Creation: Green screen helps plain backgrounds with engaging visuals to make videos more dynamic and viewer-friendly.
- Marketing and Advertisements: Create professional promotional videos with branded or themed backgrounds for a stronger impact.
- Online Teaching Videos: Use clean virtual backgrounds to keep focus on the instructor and improve learning clarity.
- Gaming Content: Add immersive environments or overlays to enhance storytelling in gameplay videos.
- Social Media Reels: Produce eye-catching short videos with creative background effects to boost engagement.
- Film and Short Video Projects: Build cinematic scenes by placing actors into custom or fantasy environments.
Conclusion
To wrap it up, this article offered a detailed guide on how to use a green screen video editor. It explored methods, features, and editing scenarios for better understanding. Wondershare Filmora stands out as a preferred choice due to its easy interface and strong editing capabilities. It allows smooth Chroma Key processing and helps users create professional-looking videos without technical difficulty.
Note to the Reader: This article is for informational use only and is not associated with or reflective of the official position of any publishing entity.
Read more: Ronaldo & Messi Leg Insurance Value in INR [UPDATED 2026]