The “First Foothold” quest in Arc Raiders serves as your introduction to the expansive Blue Gate map, teaching you essential exploration mechanics and interaction systems through four distinct objectives. Whether you’re a solo survivor or part of a squad, mastering this early-game mission sets the foundation for more complex operations ahead.
This comprehensive guide breaks down each objective with precise locations, tactical tips, and common pitfalls to avoid, ensuring you complete this quest efficiently and safely.
Table of Contents
Arc Raiders Quest Overview
| Quest Element | Details |
|---|---|
| Quest Name | A First Foothold |
| Location | Blue Gate Map |
| Objectives | 4 Separate Tasks |
| Quest Giver | Apollo at Speranza |
| Difficulty Level | Beginner-Friendly |
| Recommended Team Size | 1-3 Players |
| Extraction Required | No (but recommended for loot) |
| Estimated Completion | 15-20 minutes |
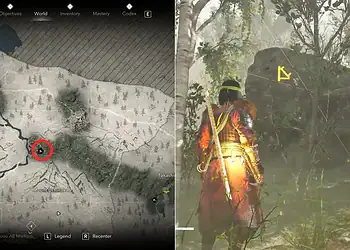
Objective 1: Stabilize the Observation Dock Near Ridgeline
Your first task takes you to the Ridgeline region, a scenic elevated area perfect for reconnaissance once you’ve completed this objective.
Location Details: Head toward the Ridgeline marker on your map. You’re looking for a raised metal platform—this is the observation dock requiring stabilization. The platform is fairly prominent against the landscape, making it relatively easy to spot from a distance.
How to Complete:
- Approach the observation dock from below
- Locate the support beams beneath the platform structure
- Look for the interaction prompt “Stabilize Deck”
- Hold the interact button to complete the stabilization
Tactical Tips:
- Clear the immediate area of hostiles before interacting—the stabilization animation leaves you vulnerable for several seconds
- Use the elevated position afterward to scout surrounding areas for threats or points of interest
- This location offers excellent sightlines for sniper coverage if playing with teammates
The observation dock becomes a valuable strategic position once stabilized, so remember this location for future missions requiring elevated vantage points.
Objective 2: Enable the Comms Terminal Near Olive Grove
Communication networks are essential for coordinating Raider activities, and this objective introduces you to terminal activation mechanics you’ll use throughout Arc Raiders.
Location Details: Travel southwest from the Olive Grove region. You’re searching for a small hillside camp setup—not a large compound, but rather a modest outpost with makeshift structures. The communications terminal inside has a distinctive yellow glow that helps with identification.
How to Complete:
- Navigate to the hilltop camp southwest of Olive Grove
- Enter the camp area and search for the yellow communications terminal
- Approach and interact with “Enable Comms Terminal”
- Wait for the activation sequence to complete
Tactical Tips:
- The terminal can be obscured by foliage—look for the yellow glow of the control panel rather than the terminal itself
- This camp location often contains supply crates and scattered loot, so search thoroughly before departing
- Enemy patrols occasionally pass through this area; establish a perimeter watch if playing with teammates
Enabling communication terminals restores network functionality for your faction, providing narrative context about rebuilding infrastructure in the post-apocalyptic world.
Objective 3: Rotate Satellite Dishes on the Church Roof (North of Data Vault)
This objective tests your vertical navigation skills and introduces rooftop interaction mechanics essential for advanced gameplay.
Location Details: Navigate north of the Data Vault landmark until you spot a large, old church structure. The building’s distinctive architecture makes it unmistakable—look for the traditional church silhouette with a peaked roof.
How to Complete:
- Locate the church building north of Data Vault
- Find the stacked boxes or scaffolding adjacent to the church exterior
- Climb to the rooftop using these structures
- Locate the satellite dish on the roof
- Interact with “Rotate Dishes” to realign communications
Tactical Tips:
- The rooftop is exposed and visible from considerable distances—complete this objective quickly to minimize detection
- Check for enemy drones or aerial units before climbing; you’re extremely vulnerable while on the roof
- The scaffolding can be tricky to navigate; approach from the correct angle to trigger climbing prompts
- After completing the objective, don’t jump down immediately—use the height advantage to survey surrounding areas
This church location frequently appears in other quests, so memorizing the climbing route saves time in future missions. The elevated position also provides excellent reconnaissance opportunities for identifying nearby points of interest.
Objective 4: Nail Down Roof Plates Near Trapper’s Glade
The final objective sends you to the western portion of the map, introducing you to the Trapper’s Glade region—a wooded area that becomes important in later progression.
Location Details: Head west toward Trapper’s Glade, a forested zone characterized by dense tree coverage. You’re searching for a Raider outpost structure with visibly damaged roofing. Traffic cones positioned around the damaged section serve as helpful visual markers.
How to Complete:
- Travel to Trapper’s Glade in the western map section
- Identify the Raider structure with damaged roofing (look for traffic cones)
- Climb onto the roof using nearby structures or terrain features
- Locate the loose roof panels
- Interact with “Nail Down Roof Plates” to secure them
Tactical Tips:
- Trapper’s Glade is typically quieter than other regions, but remain vigilant for wandering Raiders
- The traffic cones provide excellent visual guidance—if you see orange cones, you’re in the right location
- Complete the repair interaction quickly in case enemy patrols enter the area
- This structure often contains internal loot rooms accessible from ground level; explore before departing
This objective demonstrates the game’s focus on rebuilding and repairing infrastructure, a recurring theme throughout Arc Raiders’ narrative and progression systems.
Completing and Turning In the Quest
Once all four objectives are complete, your quest log will update, instructing you to return to Apollo at Speranza—your home base and primary quest hub. Here’s what you need to know:
Extraction Considerations: Technically, extraction isn’t required to complete the quest. You can immediately return to Apollo through the menu system. However, if you’ve collected valuable loot, resources, or equipment during your exploration, extracting ensures you keep everything you’ve gathered.
Extraction Points: Blue Gate features multiple extraction zones marked on your map. The closest extraction point to Trapper’s Glade (your final objective location) is typically to the southeast. Head there, defend the extraction zone if necessary, and extract with your spoils.
Quest Rewards: Upon turning in “First Foothold” to Apollo at Speranza, you’ll receive experience points, currency, and potentially unlock access to subsequent quest chains that deepen your understanding of Arc Raiders’ world and mechanics.
Additional Tips for Success
Map Familiarization: This quest deliberately sends you to four different regions, teaching you Blue Gate’s layout organically. Pay attention to landmarks, terrain features, and regional boundaries—this knowledge proves invaluable for future missions.
Resource Collection: Each objective location contains loot containers, resource nodes, or abandoned supplies. Thoroughly search each area before moving to the next objective to maximize your efficiency.
Enemy Patterns: Note enemy patrol routes and spawn locations as you complete objectives. Understanding AI behavior patterns helps you avoid unnecessary combat or plan effective ambushes.
Team Coordination: If playing with friends, assign roles—one player completes objectives while others provide security. This dramatically reduces completion time and increases survival rates.
For comprehensive Arc Raiders quest guides and gameplay strategies, explore our expert coverage. Visit Embark Studios’ official website for the latest Arc Raiders updates, patch notes, and community events.
Stay informed about survival game tactics and mission walkthroughs to dominate the post-apocalyptic battlefield.
Frequently Asked Questions
Q: Can I complete the First Foothold quest objectives in any order, or must they be done sequentially?
A: You can complete the First Foothold quest objectives in any order you prefer—the game doesn’t enforce a sequential progression. However, there’s strategic value in following the suggested order (Ridgeline → Olive Grove → Church → Trapper’s Glade) as it creates an efficient travel route across the Blue Gate map, minimizing backtracking. The Ridgeline observation dock is typically the closest to your starting position, while Trapper’s Glade sits on the western edge, making it logical as a final destination before extracting. That said, if you encounter heavy enemy presence at one location, feel free to skip it temporarily and return after completing safer objectives. The quest tracker shows all four objectives simultaneously, allowing complete flexibility in your approach.
Q: What should I do if enemies are camping the objective locations and I keep dying?
A: Enemy presence at First Foothold objectives can be frustrating, but several strategies can help. First, remember that stealth is often more effective than combat—use crouch-walking and natural cover to approach objectives undetected, complete the interaction quickly, and retreat before enemies respond. Second, if an objective area is heavily contested, skip it temporarily and complete other objectives first; enemy positions and patrol routes change dynamically, so returning later might find the area clear. Third, interaction animations can’t be canceled once started, so ensure the immediate area is completely clear before initiating—even a single enemy can interrupt you. Fourth, consider extracting and starting a fresh raid if you’ve already collected valuable loot; it’s better to preserve your gains than risk losing everything. Finally, if playing solo consistently proves difficult, consider using the matchmaking system to find teammates—having even one partner for covering fire dramatically increases success rates for objective-based missions like First Foothold.