Hunting those elusive golden beetle-like Nymphs in Honkai Star Rail’s Nightmare’s Echo Great Tomb of the Nameless Titan? These collectibles might be small, but they reward you with valuable Stellar Jades from the Garmentmaker Outpost. With 10 Nymphs scattered across this massive map—some hidden on elevated platforms, broken pillars, and tricky ledges—this complete location guide will help you catch every single one efficiently. Let’s start the hunt!
Table of Contents
Honkai Star Rail Reference: All 10 Nymph Locations
| Nymph # | Starting Point | Location Description | Difficulty |
|---|---|---|---|
| 1 | Missing Data Port | Elevated surface near wall behind spawn | Easy |
| 2 | Missing Data Port | Right side after Hand of Zagreus bridge, beside chest | Easy |
| 3 | Forsaken Realm Platform | End of platform, beside Spirithief Bartholos | Easy |
| 4 | Forsaken Realm (Mistletoe) | Between two red flashing lights (fly upward) | Medium |
| 5 | Southwest Platform (Mistletoe) | Eastern edge of platform | Medium |
| 6 | Western Platform (Mistletoe) | Below landing pad, beside stairs (look down) | Hard |
| 7 | Middle Platform (Mistletoe) | Western edge on slanted pillar | Medium |
| 8 | Middle Platform (Mistletoe) | Southeast on broken pillar (most challenging) | Hard |
| 9 | Eastern Platform (Mistletoe) | North-eastern edge below landing pad | Medium |
| 10 | Abandoned Matrix of Disorder | On small rock south of teleport | Easy |
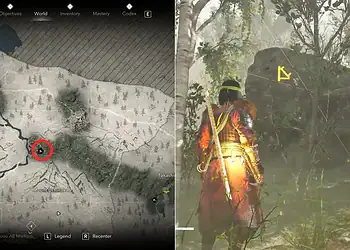
🔍 Detailed Nymph Location Walkthrough
Nymphs 1-2: Missing Data Port Area (Easy Start)
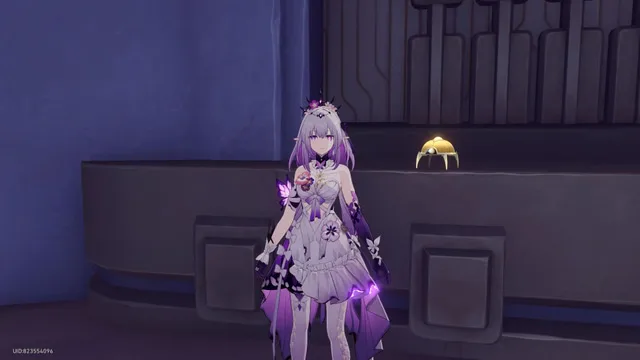
Nymph 1: Teleport to the Missing Data Port Space Anchor—your starting point. Immediately turn around after spawning and walk toward the wall. Look up slightly; the first Nymph sits on an elevated surface above you. Simple catch to warm up!
Nymph 2: From Nymph 1’s position, turn around and follow the natural path forward until you reach the Hand of Zagreus bridge. Cross this bridge, and you’ll immediately spot the second Nymph on your right side, conveniently located beside a treasure chest. Two down, eight to go!
Nymph 3: Forsaken Realm Platform (Ground Level)
Nymph 3: Teleport to the Forsaken Realm Platform Space Anchor. After spawning, do a 180-degree turn and walk straight to the platform’s end. The Nymph waits beside a Spirithief Bartholos enemy—don’t worry, you don’t need to fight it to collect the Nymph.
Nymphs 4-9: Mistletoe Aircraft Section (The Main Challenge)
This sequence requires the Mistletoe aircraft, so make sure you’ve unlocked it. These six Nymphs test your flying skills and observation.
Nymph 4: Walk to the Mistletoe spawn point near Forsaken Realm Platform. Board the aircraft and fly straight upward. Between two flashing red lights, you’ll spot the Nymph suspended in mid-air. Position carefully before dismounting!
Nymph 5: Using Mistletoe, fly southwest to the next platform. Once you land, head to the eastern edge of this platform. The Nymph sits right on the ledge—easy pickup after the flight.
Nymph 6 (Tricky!): Board Mistletoe again and head to the western platform. Land on the pad, then walk down from it and turn right. Here’s the trick: immediately look DOWN while standing beside the stairs. The Nymph hides below you. Press “Interact” when the “Catch” prompt appears. This one’s easy to miss!
Nymph 7: Back on Mistletoe, use the Auto-Cruise feature to reach the middle platform (this makes navigation much easier). After landing, walk to the western edge. The Nymph perches on a slanted pillar—angle your camera to see it clearly.
Nymph 8 (Most Challenging!): Still on the middle platform, board Mistletoe and fly southeast. This requires careful navigation—the Nymph sits on a broken pillar floating in space. Look for fragmented architecture; the golden beetle stands out against the dark background. Take your time positioning the aircraft.
Nymph 9: From Nymph 8’s location, fly toward the eastern platform. Land on the pad, then walk down from it. Head to the north-eastern edge of this platform to find the ninth Nymph. Almost done!
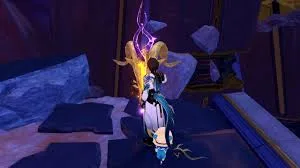
Nymph 10: Abandoned Matrix of Disorder (Final One!)
Nymph 10: For the final Nymph, teleport to the Abandoned Matrix of Disorder Space Anchor. Walk south from the teleport point. On your left side, you’ll see a small rock formation—nothing fancy, just a simple rock. The last Nymph sits on it, waiting to complete your collection!
🎁 Claiming Your Rewards
After catching all 10 Nymphs, head to the Wandering Garmentmaker at the Garmentmaker Outpost. Turn in your collection to receive:
- Stellar Jades – The premium currency for character pulls
- Additional rewards – Various materials and upgrade items
These Stellar Jades add up, especially for free-to-play Trailblazers saving for upcoming banners. Every collectible counts toward your next 5-star character!
💡 Pro Tips for Efficient Nymph Hunting
- Use Interactive Map Markers: Pin locations as you collect to track progress
- Adjust Camera Angles: Many Nymphs are above or below eye level
- Master Mistletoe Controls: Practice flying before tackling Nymphs 4-9
- Look for Golden Shimmer: Nymphs emit a faint golden glow, making them easier to spot
- Collect in Order: Following this guide’s sequence minimizes backtracking
- Check Twice: Nymph 6 and 8 are frequently missed—double-check these locations
For more Honkai Star Rail guides and character builds, visit the official HoYoverse website and join the discussion on HoYoLAB community.
Looking for more Trailblazer content? Explore our character build guides, Light Cone rankings, relic farming strategies, and upcoming banner predictions at TechnoSports.
❓ Frequently Asked Questions
Q1: Do Nymphs respawn after collecting them, or is this a one-time collection?
Nymphs in the Great Tomb of the Nameless Titan are one-time collectibles—once you catch them, they do not respawn. This is consistent with most collectible mechanics in Honkai Star Rail. After turning in all 10 Nymphs to the Wandering Garmentmaker at the Garmentmaker Outpost, you’ll receive your rewards, and the collection quest completes permanently. However, this shouldn’t cause concern about missing them. The Nymphs remain available indefinitely until collected, so there’s no time pressure or limited event window. You can return to catch any missed Nymphs at your convenience, even weeks or months after first exploring the area. The game tracks which Nymphs you’ve already collected, so if you’re unsure which ones you’re missing, simply revisit all the locations listed in this guide—uncollected Nymphs will still be visible and interactive.
Q2: I can’t find Nymph 6 or 8—what am I doing wrong?
Nymphs 6 and 8 are the trickiest to locate because they require specific camera angles and positioning. For Nymph 6, the critical mistake most players make is not looking DOWN. After landing on the western platform and walking down from the landing pad, you must turn right and then immediately tilt your camera downward while standing beside the stairs. The Nymph is literally below your feet on a lower ledge—you won’t see it looking straight ahead. Wait for the “Catch” interaction prompt to appear. For Nymph 8, the challenge is different—it’s about aerial navigation. From the middle platform, you need to fly southeast using Mistletoe toward a broken pillar that’s floating independently. The pillar isn’t connected to any platform, so it’s easy to miss while flying. Look for a fragmented stone column against the darker background. Slow down your Mistletoe speed, scan the environment carefully, and approach the pillar from different angles. The golden shimmer of the Nymph should become visible once you’re close enough. If still struggling, use the Auto-Cruise feature to survey the area systematically.