Struggling with Trader Lance’s Prescriptions of the Past mission in Arc Raiders? You’re not alone. This exploration quest sends you deep into Spaceport’s dangerous Departure Building, where ARC enemies and hostile Raiders lurk around every corner. But don’t worry—we’ve got the perfect roadmap to help you collect those medical records and claim your rewards safely.
Table of Contents
Arc Raiders Overview: Quick Reference
| Quest Giver | Trader Lance |
|---|---|
| Map Location | Spaceport (Topside) |
| Difficulty | Medium |
| Rewards | 3 Adrenaline Shots, 1 Heavy Shield, 1 Tactical Mk.III |
| Recommended | Squad play for easier completion |
Step-by-Step Walkthrough
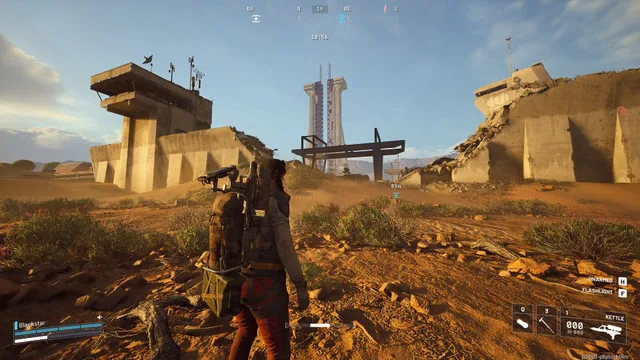
Objective 1: Reach the Departure Building
Your first task is navigating to Spaceport’s western section. Look for the massive structure with distinctive red walls near the central Launch Towers—you can’t miss it. This building stands out prominently against the surrounding architecture.
Pro Tip: The journey through Spaceport’s central area is treacherous. Higher threat-level POIs mean more aggressive enemies. Move tactically between cover points and scout ahead before advancing. Playing with a full squad dramatically reduces the danger.
Objective 2: Locate the Medical Exam Room
Enter the Departure Building through the large southern entrance. Once inside:
- Turn right and climb the stairs to the upper floor
- Take the right-side corridor, then make a left turn
- Continue through the room toward the building’s edge
- Exit and look for a desk positioned near the window
Important: The building’s interior is pitch black. Equip your Torch immediately to navigate safely. ARC scanners patrol these hallways—stealth is crucial. Avoid unnecessary combat that could alert nearby enemies and complicate your mission.
Objective 3: Retrieve the Medical Records
The documents you need are sitting on the desk near the window. Simply interact with the glowing item to complete the objective. Once collected, the quest updates automatically, and you’re free to extract.
Exit Strategy: Don’t rush out carelessly. Plan your extraction route to the nearest safe zone. Keep your weapon ready—other Raiders might ambush you on the way out, knowing you’ve just looted valuable items.
Maximizing Your Rewards
Completing Prescriptions of the Past grants you essential survival gear from Trader Lance. The three Adrenaline Shots provide crucial healing during intense firefights, while the Heavy Shield offers excellent protection against ARC enemies you’ll encounter in future raids. The Tactical Mk.III rounds out your loadout perfectly.
These rewards make this quest worth completing early in your Arc Raiders progression. The items directly enhance your survivability for tougher missions ahead.

Strategic Tips for Success
Equipment Recommendations: Bring suppressed weapons to maintain stealth. Pack healing items and ensure your armor is fully repaired before entering Spaceport.
Squad Coordination: If running with teammates, designate one player as scout, another as rear guard. Communication prevents ambushes and helps everyone extract safely.
Map Knowledge: Familiarizing yourself with Spaceport’s layout pays dividends. Check out more Arc Raiders quest guides on TechnoSports to master other challenging locations.
FAQs
Can I complete Prescriptions of the Past solo, or do I need a squad?
You can absolutely tackle this quest solo, though it’s significantly more challenging. The Departure Building’s tight corridors and patrolling ARC enemies create tense moments when you’re alone. Squad play provides covering fire and revive opportunities if things go wrong. Solo players should prioritize stealth over combat and bring extra healing items for emergencies.
What happens if I die before extracting with the medical records?
If you’re eliminated after collecting the records but before extracting, you’ll need to restart the quest from the beginning. Arc Raiders follows extraction shooter mechanics—death means losing your progress and collected items. Always prioritize safe extraction over additional looting once you’ve completed your objective. Mark the nearest extraction point on your map before entering the building.