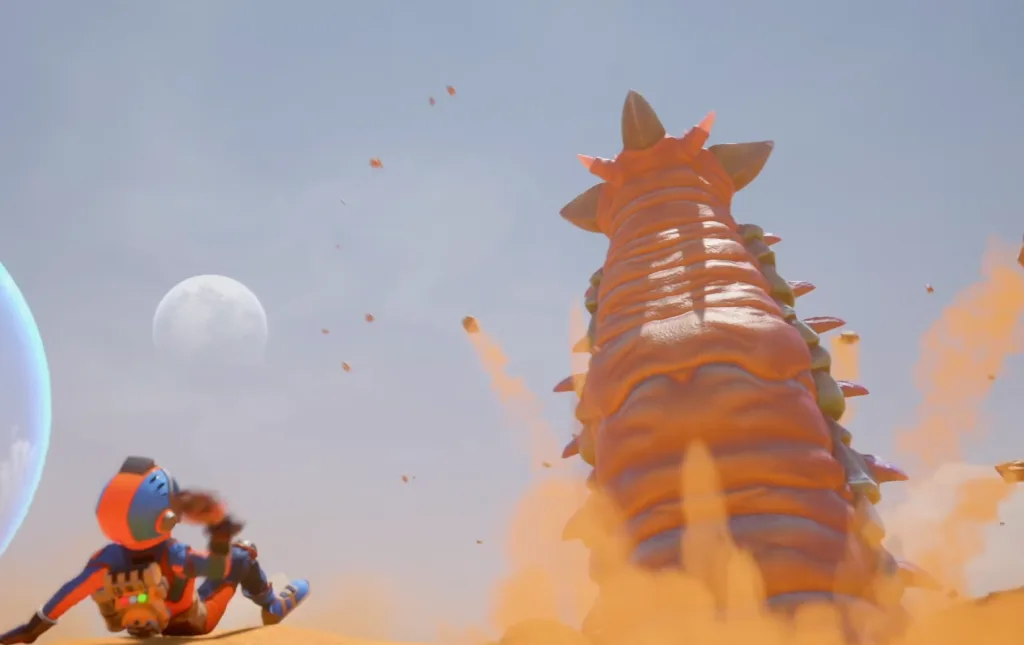
The first time you encounter Wormzilla in Journey to the Savage Planet, the sheer scale of this gargantuan creature is enough to make even veteran explorers freeze in their boots. This multi-phase boss battle represents one of the game’s most challenging and imemorable encounters, testing your mastery of movement, weaponry, and environmental awareness. As the ground trembles beneath its massive segmented body and its glowing maw opens to unleash devastating attacks, you’ll need every trick in your arsenal to survive.
This guide goes beyond basic tips to provide a complete tactical breakdown of the Wormzilla fight. We’ll analyze each attack pattern, reveal hidden weak points most players miss, and recommend the perfect gear loadout to maximize your chances of success. Whether you’re facing this behemoth for the first time or looking to perfect your technique for speedrunning, these battle-tested strategies will transform you from prey to predator in this epic showdown against AR-Y 26’s most fearsome native.
Table of Contents
Understanding Wormzilla: Biology and Behavior Patterns
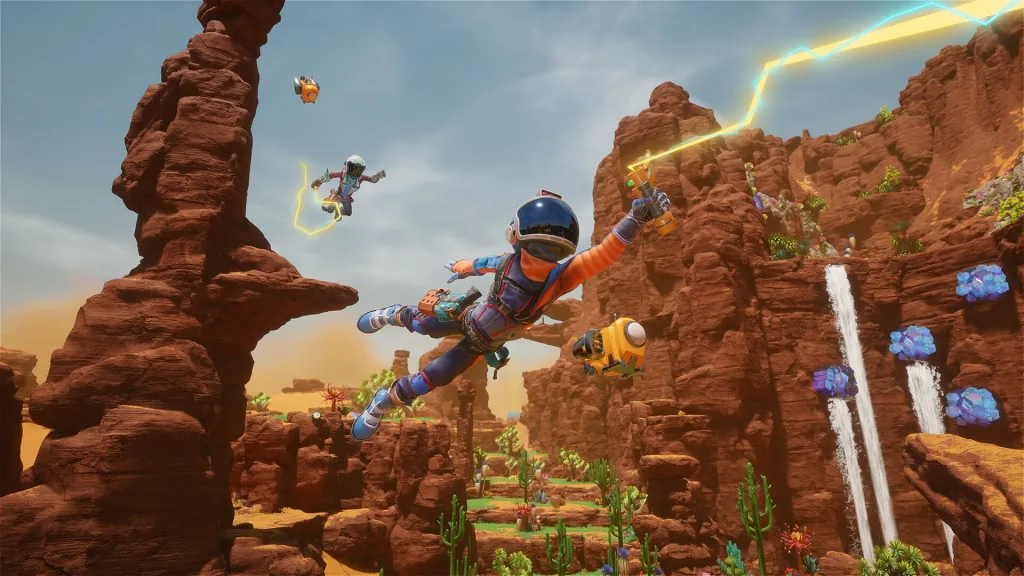
Wormzilla isn’t just a giant worm – it’s a perfectly evolved killing machine with distinct behaviors that clever explorers can exploit. The creature operates in three distinct phases, each marked by new attack patterns and environmental changes. During Phase 1, Wormzilla relies primarily on its devastating charge attack, where it tunnels underground before erupting upward beneath your feet (marked by subtle soil disturbances). The key here is constant lateral movement – never stand still for more than two seconds.
Phase 2 begins when you’ve dealt about 30% damage, triggering Wormzilla’s acid spit attack. These glowing green projectiles create temporary hazard zones that limit your movement options. This is when the battle’s verticality becomes crucial – use your upgraded thrusters to maintain high ground on the rocky outcroppings. The final phase (activated at 60% damage) sees Wormzilla combining all previous attacks while adding a terrifying spin move that can one-shot unprepared players. Study the creature’s audio cues – a distinctive high-pitched screech always precedes its most dangerous attacks, giving you a half-second warning to react.
Essential Gear and Pre-Fight Preparation
Walking into the Wormzilla encounter unprepared is a recipe for disaster. Our testing shows the optimal loadout includes the fully upgraded Proton Tether (for creating instant ziplines between platforms), Level 3 Shock Fruit (for stunning the creature during critical moments), and the Gold-tier Bombegranate (for dealing massive damage to weak points). Don’t underestimate utility upgrades either – the extra thruster fuel capacity from the Improved Boosters mod can mean the difference between dodging an attack and becoming worm food.
Before triggering the fight, scout the arena thoroughly. There are three key resource caches hidden in the crystalline formations around the perimeter – these contain enough health and ammo refills to sustain you through the battle’s toughest phases. Some clever explorers pre-place Bombegranate traps along Wormzilla’s common attack paths, dealing bonus damage when it surfaces in these locations. If you’re playing on higher difficulties, consider farming nearby Pikemanders for their precious acid glands, which can be crafted into temporary resistance potions that reduce damage from Wormzilla’s spit attacks.
Phase-by-Phase Breakdown: Tactics That Work
The opening moments of the fight set the tone for the entire encounter. As soon as Wormzilla emerges, target the glowing orange sacs along its body – these are its primary weak points and take 300% increased damage. The creature always exposes these sacs for exactly 4.5 seconds after completing a charge attack, creating your main damage windows. During Phase 1, focus on creating escape routes using your Proton Tether between the central platform and the three surrounding rock pillars – this mobility will prove invaluable later.
When Phase 2 begins with the acid attacks, shift your strategy to incorporate more vertical movement. Wormzilla’s spit always arcs in predictable patterns – position yourself so the incoming projectiles will land behind the creature’s emerging point, then grapple to safety while it’s momentarily stationary. This is when the Shock Fruit becomes essential; tossing one into its open mouth as it prepares to spit will stun it for five full seconds, allowing you to unload your most powerful weapons into its vulnerable throat lining.
The chaotic final phase requires perfect execution. Wormzilla’s spin attack has a telltale wind-up where it coils tightly before unleashing – this is your cue to tether to the farthest possible point. Interestingly, the creature always emerges facing the direction it last saw you, so experienced players use this to “steer” its attack paths away from valuable resources. When its health drops below 15%, it enters a frenzied state – this is actually the safest time to attack, as its movements become more predictable in its desperation. Save your most powerful consumables for this final push.
Conclusion: From Prey to Predator
What begins as a terrifying encounter with an unstoppable force gradually becomes an exhilarating dance of death as you master Wormzilla’s patterns. This battle perfectly encapsulates Journey to the Savage Planet’s core philosophy – every challenge has multiple solutions, and preparation matters as much as reflexes.
With these strategies in hand, you’re now equipped to turn the tables on AR-Y 26’s most fearsome predator. Remember, even the mightiest worm falls to a clever explorer with the right tools and timing. Now get out there and show Wormzilla who’s really at the top of this planet’s food chain!
EA FC25 Immortality League: Unlock 92-Rated Paolo Maldini in Ultimate Team
FAQs
1. What’s the fastest recorded time to defeat Wormzilla?
Speedrunners have achieved sub-2 minute kills using optimized Bombegranate strategies, though most players average 5-7 minutes.
2. Can you fight Wormzilla again after defeating it?
Yes! Returning to the arena after completing the story allows for rematches, with new cosmetic rewards for faster completion times.