Hunting for every Golden Scapegoat puzzle in Honkai Star Rail‘s latest 3.6 update? You’ve come to the right place! The Radiant Scarwood Grove of Epiphany area features four mind-bending puzzles that reward Stellar Jades and valuable resources—if you can navigate your avatar to the altar while dodging those pesky shadows.
Whether you’re a completionist chasing 100% exploration or just want those free Stellar Jades for your next warp, this comprehensive guide covers all four puzzle locations and their step-by-step solutions.
Table of Contents
Honkai Star Rail: Quick Overview
| Puzzle | Location | Quest Required? | Difficulty |
|---|---|---|---|
| Puzzle #1 | First Floor (via Sealed Chamber) | No | Easy |
| Puzzle #2 | Second Floor (Golden Bough of Gnosis) | No | Medium |
| Puzzle #3 | Teary Court Ruins (West Courtyard) | No | Medium |
| Puzzle #4 | Underwater Area | Yes (Bartholos’s Trouble) | Hard |
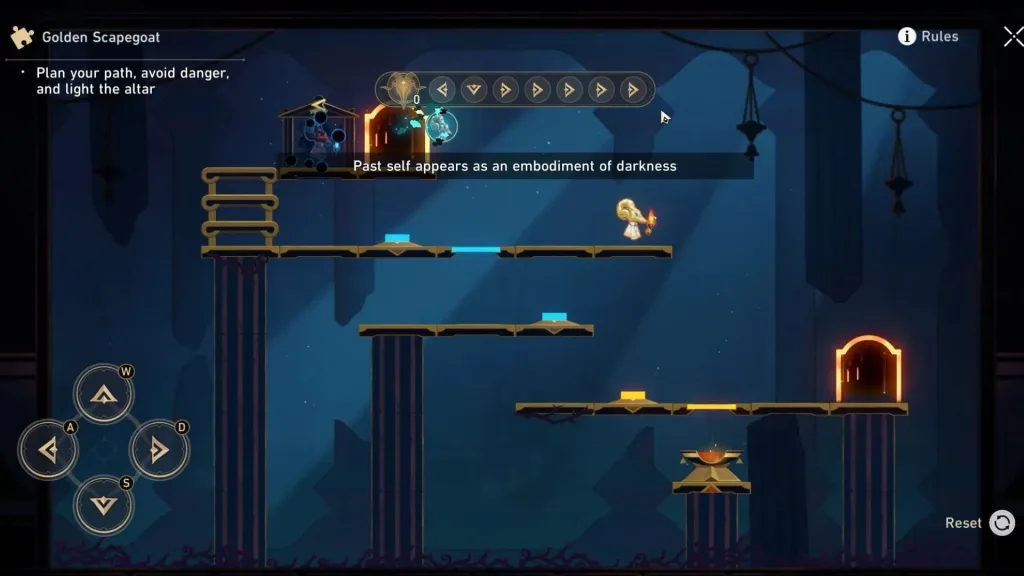
How Golden Scapegoat Puzzles Work
Before diving into locations, here’s the basic mechanic: guide your avatar along a grid to reach the altar without touching the shadow that mimics your movements. Think of it as a chess puzzle where your shadow is always one move behind, and touching it means instant failure.
Pro tip: Plan your entire route before making the first move. One wrong turn can trap you with no escape!
Puzzle #1: First Floor Solution
Location: First floor of Radiant Scarwood, accessible through the Sealed Chamber. Teleport to the basement Space Anchor and take the elevator up.
Solution Steps:
- Left → Down → Right → Right → Right → Right → Right
- Then press Right seven more times to reach the altar
This is the easiest Golden Scapegoat puzzle in the area—perfect for warming up before tackling the trickier ones. The straightforward path makes it beginner-friendly, though you still need precision with directional inputs.
Puzzle #2: Second Floor Solution
Location: Second floor, above the Golden Bough of Gnosis Space Anchor. Take the stairs to the upper chamber level. You’ll find it near NPC Antisthenes.
Solution Steps:
- Right → Down → Right → Right → Right
- To reach the altar: Right → Right → Left → Right → Right → Right
This puzzle introduces more complexity with additional turns. The key is maintaining spatial awareness—it’s easy to get disoriented when you’re constantly changing direction while tracking your shadow’s position.
Puzzle #3: West Courtyard Solution
Location: Teleport to Teary Court Ruins, pass through the large doors, and follow the passage to the far west courtyard.
Solution Steps:
- Right → Right → Right → Right → Left
- Avoiding afterimage: Right → Left → Left → Right → Up → Right → Right
The third puzzle tests your ability to execute longer movement sequences. That “Up” move in the second phase can catch players off guard, so double-check your directional inputs before committing.
Puzzle #4: Hidden Underwater Solution (Quest Required)
Location: Requires completing “Bartholos’s Trouble” quest first. Pick up the quest at Teary Court Ruins by interacting with the Spirithief to enter Bartholos’s POV. Use bubble shot abilities to block the water source and rescue the trapped chimera. The puzzle appears after draining the water.
Solution Steps:
- Right → Right → Left → Left → Right → Right → Right → Right → Right → Left
- Avoiding afterimage: Left → Left → Right → Right → Right → Left → Left → Right → Left → Left
- Press Right several times to reach the altar
This is the most challenging puzzle in Radiant Scarwood Grove. The extended movement sequences demand perfect execution, and one mistake means starting over. Take your time and visualize each step before moving.
Rewards for Completing All Puzzles
Each Golden Scapegoat puzzle rewards:
- Stellar Jades – The premium currency for warps
- Credits – Always useful for leveling characters
- Random Materials – Upgrade items for your team
While individual rewards might seem modest, completing all four adds up to a meaningful contribution toward your next limited character or Light Cone pull. For free-to-play players especially, these Stellar Jades are precious.
Tips for Solving Golden Scapegoat Puzzles
Map the entire path: Before touching anything, trace your route mentally or on paper.
Watch the shadow: Your afterimage follows one move behind—use this predictable pattern to your advantage.
No rush: These puzzles don’t have timers. Take breaks if you’re getting frustrated.
Practice makes perfect: The more puzzles you solve, the better you’ll understand shadow movement patterns.
Use landmarks: Orient yourself using the grid’s corners and edges to avoid getting lost.
Why These Puzzles Matter
Beyond the immediate rewards, Golden Scapegoat puzzles contribute to your overall Radiant Scarwood Grove exploration percentage. Completionists aiming for 100% area exploration must solve all four puzzles.
Additionally, these brain teasers provide a nice break from combat-focused content. Honkai Star Rail excels at mixing action, story, and puzzle-solving, and the Golden Scapegoat challenges exemplify this variety.
What’s Next in Version 3.6?
The Radiant Scarwood Grove of Epiphany area contains much more than just Golden Scapegoat puzzles. Explore thoroughly to discover:
- Hidden treasure chests
- Spirithief locations for additional rewards
- Environmental puzzles beyond the Golden Scapegoat series
- Lore snippets that expand the Honkai universe
Check the official HoYoverse website for the latest updates and events in version 3.6.
Final Thoughts
All four Golden Scapegoat puzzles in Radiant Scarwood Grove of Epiphany are now within your grasp! Remember that Puzzle #4 requires completing Bartholos’s Trouble quest first, so don’t panic if you can’t find it immediately.
These puzzles perfectly blend challenge and reward, making them worthwhile for all Trailblazers. Happy puzzle-solving, and may your Stellar Jade stash grow ever larger!
FAQs
Q: Can I complete the Golden Scapegoat puzzles in any order?
Yes, you can complete the first three Golden Scapegoat puzzles in Radiant Scarwood Grove in any order you prefer. However, Puzzle #4 is locked behind the “Bartholos’s Trouble” quest, which you must complete first to access the underwater area where this puzzle is located. The quest itself is straightforward—interact with the Spirithief at Teary Court Ruins, enter Bartholos’s POV, and use bubble shot abilities to drain the water.
Q: What happens if I fail a Golden Scapegoat puzzle?
If you touch the shadow/afterimage or make an impossible move, the puzzle simply resets to the starting position. There’s no penalty for failure—no HP loss, no resource consumption, and no limited attempts. You can try as many times as needed until you successfully reach the altar. This forgiving design encourages experimentation and learning from mistakes without punishing players for trial-and-error approaches. Check HoYoverse’s official support if you encounter technical issues with puzzle mechanics.