
Finding the Shard Pendant in Hollow Knight Silksong can dramatically change your early game experience. This crucial Crest charm boosts your Shell Shard collection, making resource management significantly easier as you explore the dangerous world of Pharloom.
Table of Contents
What Is the Hollow Knight Silksong Shard Pendant and Why You Need It
The Shard Pendant is one of the first Crest charms you can obtain in Hollow Knight Silksong. This powerful accessory increases the number of Shell Shards dropped by defeated enemies, making it invaluable for players who want to maximize their combat tool usage throughout the game.
Since Shell Shards fuel many of Hornet’s abilities, having this charm early gives you a significant advantage in both exploration and combat scenarios.
Shard Pendant Quick Reference
| Attribute | Details |
|---|---|
| Type | Crest Charm |
| Effect | Increases Shell Shard drops from enemies |
| Location | The Marrows (Upper section) |
| Difficulty | Moderate platforming required |
| Recommended Level | Early game (before leaving The Marrows) |
| Prerequisites | Basic movement abilities |
Step-by-Step Shard Pendant Location Guide
Starting Point: The Marrows Base Bench
Your journey begins at the resting bench at the foundation of The Marrows, right next to the pilgrim milestone. This location serves as the closest safe starting point for your charm-hunting expedition.
From this bench, you’ll embark on a challenging platforming sequence that tests your mastery of Hornet’s movement abilities.
The Complete Route Breakdown
Phase 1: Initial Movement
- Head right from the bench
- Jump across the boney platform
- Continue right until you reach the first platforming challenge
Phase 2: The Stone Block Puzzle
- Climb onto the small platform above
- Move left to trigger the heavy stone block to fall
- Use the fallen block as a stepping stone to reach the metal platform
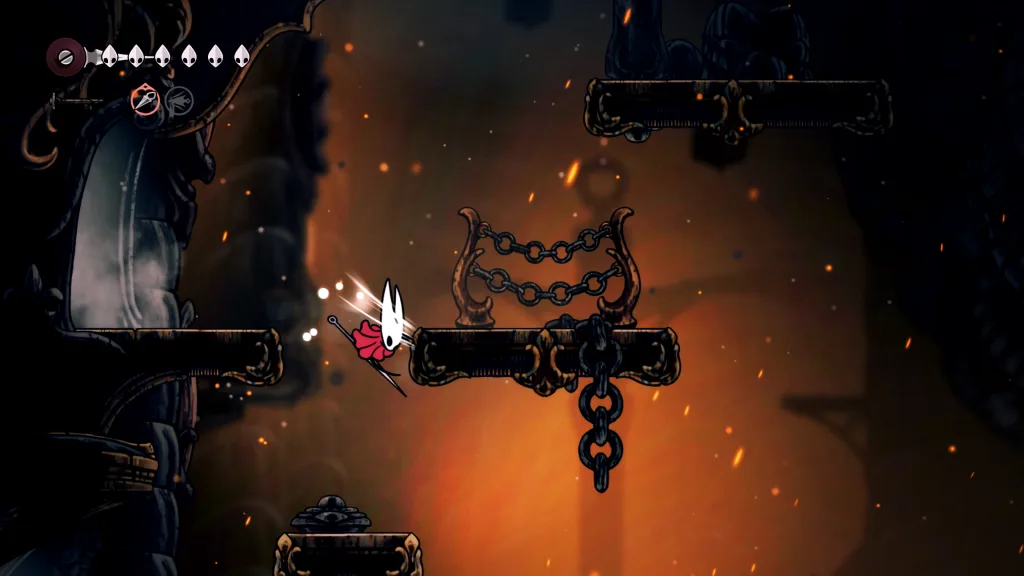
Phase 3: Enemy Encounters
- Be prepared for a Charger enemy that awakens in this section
- Either defeat it quickly or jump over it to continue
- Navigate carefully around the thorny obstacles
Phase 4: Complex Platforming
- Continue left until you hit an impassable wall
- Turn right and use the flying enemy as a platform
- Ascend to the upper level using precise timing
Phase 5: The Final Ascent
- Navigate through crumbling platforms (move quickly!)
- Deal with another diving fly enemy from above
- Face the giant Charger in the final room
- Enter the chamber containing the Shard Pendant
Combat Tips for the Journey
The path to the Shard Pendant isn’t just about platforming—you’ll face several challenging enemies. Here’s how to handle them effectively:
Charger Enemies: These rushing foes can be either avoided with well-timed jumps or defeated with quick strikes. For advanced combat techniques, consider baiting their charge and counter-attacking.
Flying Enemies: Use these as temporary platforms, but time your jumps carefully as they move in predictable patterns.
Why Get the Shard Pendant Early?
Collecting this charm before venturing beyond The Marrows provides several strategic advantages:
- Resource Efficiency: More Shell Shards mean more ability usage
- Combat Flexibility: Enhanced resource generation supports aggressive playstyles
- Exploration Benefits: Extra resources help with challenging platforming sections
The official Team Cherry development blog emphasizes the importance of early charm collection for optimal progression.
Advanced Strategies and Tips
For players looking to optimize their Silksong experience, consider these expert gaming strategies:
Timing is Everything: The crumbling platforms require precise movement. Practice the sequence if you fail the first time.
Enemy Management: Don’t feel obligated to defeat every enemy—sometimes evasion is the better strategy.
Resource Conservation: Save your Shell Shards for the final combat encounters near the pendant location.
Integration with Other Early Game Items
The Shard Pendant works exceptionally well with other early-game finds. Check out our comprehensive Hollow Knight Silksong item guides for strategies on combining charms effectively.
Consider pairing this pendant with defensive charms if you’re struggling with the increased enemy encounters that come from extended exploration.
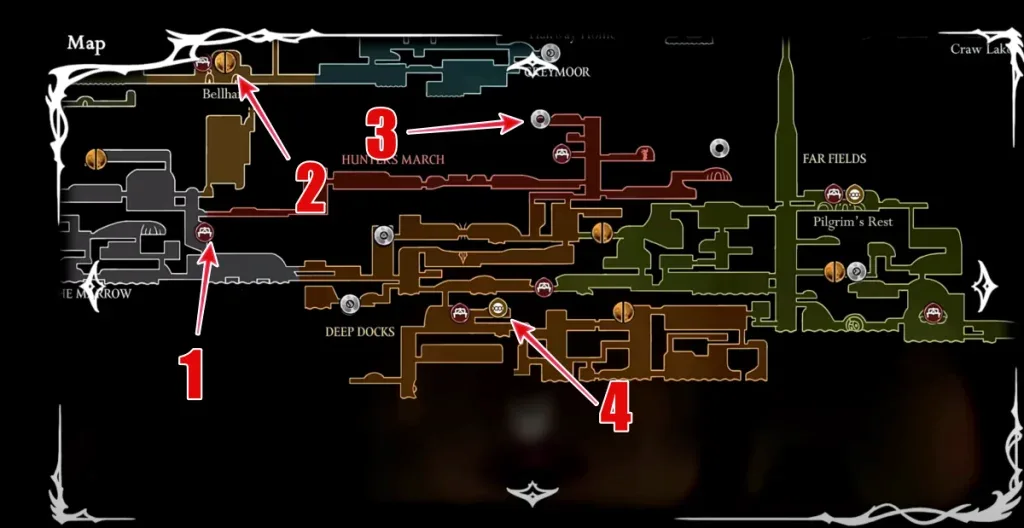
Map Location Reference
For visual learners, the Shard Pendant appears in the upper section of The Marrows area on your map. Look for the distinctive room layout that branches off from the main pathway—this secluded chamber houses your prize.
The location is accessible relatively early but requires mastery of basic movement mechanics and some combat proficiency.
Frequently Asked Questions
Q: Can I get the Shard Pendant without fighting the Charger enemies?
A: While it’s technically possible to avoid some enemies through careful jumping and timing, you’ll likely need to deal with at least one Charger during the final approach. The giant Charger near the pendant room is particularly difficult to avoid, so come prepared with combat strategies.
Q: What happens if I fall during the platforming sections?
A: If you fall during the crumbling platform section or other challenging areas, you’ll need to restart from your last safe platform. The game doesn’t severely punish falls, but you will lose progress through that specific section. Take your time and practice the timing for each jump sequence.