Tired of wandering ARC Raiders maps hoping to stumble across Damaged Heat Sinks? Smart raiders don’t rely on luck—they target specific tech zones where these valuable recyclables actually spawn.
These rare components transform into essential crafting materials that separate casual players from extraction legends. Let’s cut through the guesswork and pinpoint exactly where you need to go.
Table of Contents
What Makes Damaged Heat Sinks Worth Your Time?
Think of Damaged Heat Sinks as your gateway to advanced crafting. Once recycled at Speranza Hub, they break down into specialized materials you can’t obtain anywhere else. Without a steady supply, your gear progression hits a wall fast.
The catch? They only spawn in high-tech facilities—and those facilities crawl with both AI Sentinels and enemy players hungry for the same loot.
Your Complete Heat Sink Location Guide in ARC Raiders
| Location Name | Map Region | Loot Density | Danger Level | Recommended Team Size |
|---|---|---|---|---|
| Launch Tower | Spaceport Center | ★★★★★ | Very High | 3-4 players |
| Trench Towers | Spaceport East | ★★★★☆ | High | 2-3 players |
| Research & Admin | Dam Battlegrounds | ★★★☆☆ | Medium | 1-2 players |
| Pilgrim’s Peak | The Blue Gate | ★★★☆☆ | Medium | 1-2 players |
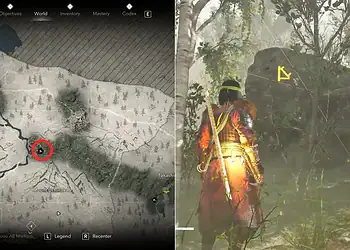
Spotting Tech POIs on Your Map
Before each raid, open your map and scan for the technology icon—it looks like a square containing circuits and connection lines. These markers guarantee tech-focused loot spawns, including your precious Heat Sinks.
According to Embark Studios, tech POIs refresh with each map instance, making every raid a new opportunity.
Location #1: Launch Tower (Best Overall)
Where: Dead center of Spaceport map Why It’s King: This multi-story industrial complex offers more tech spawn points than any other location in the game.
Launch Tower’s vertical design means dozens of potential containers across multiple floors. More containers equal more chances for Damaged Heat Sinks. The downside? Every serious raider knows this, making it a PvP magnet.
Survival Strategy: Land on upper floors to avoid initial ground-level chaos. Work your way down while looting, keeping extraction routes in mind. If you’re grinding Sentinel Firing Cores simultaneously, this location delivers both.
Location #2: Trench Towers (Spaceport Alternative)
Where: Eastern section of Spaceport Why Choose This: Nearly as good as Launch Tower with roughly 30% less player traffic.
Trench Towers provides excellent Heat Sink spawns for raiders who want high rewards without constant firefights. The layout offers better cover than Launch Tower, giving you tactical advantages during unexpected PvP encounters.
Pro Tip: Combine Trench Towers with nearby objectives from the Eyes on the Prize quest for efficient multi-tasking.
Location #3: Research & Administration (Solo-Friendly)
Where: Dam Battlegrounds map, connected to Control Tower Why It Works: Balanced risk-reward ratio perfect for solo players or small teams.
This sprawling facility contains multiple tech rooms without Launch Tower’s oppressive verticality. You can navigate horizontally, making escapes easier when things go sideways. The spawn rates aren’t quite as high, but the reduced competition often means you’ll actually extract with your loot.
Bonus: Synergizes perfectly with Dam Battlegrounds exploration routes.

Location #4: Pilgrim’s Peak (The Hidden Gem)
Where: The Blue Gate map region Why Consider It: Lower player density creates stress-free farming sessions.
Pilgrim’s Peak flies under most players’ radar, making it ideal when you simply want to collect Heat Sinks without drama. While spawn rates won’t match Spaceport locations, the peaceful looting experience compensates. Perfect for working through Flickering Threat objectives without constant interruptions.
Maximizing Your Farming Efficiency
Route Planning Strategy:
- Choose your primary location based on squad size
- Drop early to beat the rush
- Hit 2-3 tech containers minimum before rotating
- Extract when backpack reaches 70% capacity
Don’t Overstay: The biggest mistake? Getting greedy. Players who linger too long usually lose everything to late-arriving squads or extraction campers.
After the Hunt: Recycling Your Heat Sinks
Once you’ve collected Damaged Heat Sinks, head straight to any Recycling Station in Speranza Hub. The resulting materials feed directly into advanced weapon mods, electronic components, and equipment upgrades.
These materials also connect to several quests, including Espresso and Down to Earth, creating compound value from single farming runs.
Frequently Asked Questions
What’s the Respawn Timer for Damaged Heat Sinks?
Damaged Heat Sinks don’t respawn during active raids—they only refresh when the map resets for a completely new raid instance. Once a container is looted, it stays empty until that specific raid session ends. This means timing matters significantly. Early arrivals to Launch Tower or Trench Towers secure the best loot before competition arrives. If you spawn late or take too long reaching tech POIs, you’ll likely find already-opened containers with nothing inside. Plan your drop zones strategically and consider alternate locations if your preferred spot shows evidence of prior looting.
Should I Fight Other Players for Heat Sink Locations?
This depends entirely on your loadout and confidence level. If you’re undergeared or low on ammunition, avoid PvP engagements—your primary goal is collecting Heat Sinks, not racking up kills. Experienced players with competitive loadouts might contest high-value spots like Launch Tower since controlling the location provides multiple Heat Sinks per raid. Solo players should generally prioritize survival over confrontation by choosing medium-risk locations (Research & Administration or Pilgrim’s Peak). Remember: extracted loot is the only loot that matters. One successful extraction beats three failed aggressive runs.