The vast world of Teyvat expands once again with Genshin Impact 5.5 update, introducing players to new areas of Natlan that are filled with unique exploration mechanics and hidden treasures. Among these additions are the elusive Matador Monetoos, miniature fiery creatures that function similarly to Seelies but with distinct mechanics tied to Natlan’s regional features. Unlike their counterparts in other regions, these special Monetoos require interaction with the new Tatankasaur transformations or specific characters like Varesa and Iansan to be properly activated.
For completionists and treasure hunters, tracking down all fourteen of these fiery companions across Atocpan and the Ancient Sacred Mountain presents both a delightful challenge and rewarding adventure. Each successfully completed Monetoo puzzle not only grants precious items but also contributes to your overall exploration progress in Natlan, making this guide essential for maximizing your journey through Genshin Impact’s latest content update.
Table of Contents
Genshin Impact Matador Monetoo Guide: Complete Locations and Solutions
Natlan’s latest regions introduce a fiery twist to Genshin Impact’s exploration with the Matador Monetoos, smaller yet more elusive variants of the familiar Seelie companions found throughout Teyvat. These unique exploration mechanics require special interaction methods to yield their treasures, setting them apart from previous regional collectibles.

To solve each Matador Monetoo puzzle, you’ll need to repeatedly hit these creatures with attacks from either Natlan characters like Varesa and Iansan or by utilizing the region-specific Tatankasaur transformation ability. Following these bouncing fireballs and striking them consistently will eventually lead them to their final destination where hitting them twice more completes the puzzle and rewards you with a precious chest. The integration of Natlan’s Saurian mechanics adds a distinctive regional flavor to these exploration challenges.
Atocpan hosts nine of these fiery companions, with each requiring slightly different approaches to locate and activate. The first Monetoo can be found by teleporting to the northeastern waypoint and heading straight ahead where a Tatankasaur already circles the floating flame. For the second location, begin at Atocpan’s first waypoint, turn right toward the small water pool where two playful Tatankasaurs interact with the Monetoo, creating a charming natural scene that blends gameplay with environmental storytelling.
| Location | Nearest Teleport | Notable Landmarks | Additional Notes |
|---|---|---|---|
| Atocpan 1 | Northeast waypoint | Open area with Tatankasaur | Easy to spot |
| Atocpan 2 | First waypoint | Small water pool | Two Tatankasaurs nearby |
| Atocpan 3 | South of Lava Dragon Boss | Open plateau | Unlocks Warrior’s Challenge |
| Atocpan 4 | Western cliff waypoint | Cliff edge | Transformation available nearby |
| Atocpan 5 | Western cliff waypoint | Edge of map | Near Ancient Glazeback Turtle |
| Atocpan 6 | Statue of Seven | Behind statue | Multiple Tatankasaurs present |
| Atocpan 7 | Small island waypoint | Turn back view | Guarded by Sauroform Warriors |
| Atocpan 8 | Artifact domain waypoint | Beach below | Tatankasaur chase scene |
| Atocpan 9 | Southern waypoint | Straight path | Hilichurls chasing Monetoo |
| Ancient Mountain 1 | Near Infinitesimal Legend | Left side | Single Tatankasaur nearby |
| Ancient Mountain 2 | Near Infinitesimal Legend | Right side | Distant Tatankasaur visible |
| Ancient Mountain 3 | Ruined Armament Workshop | Broken bridge | First section of bridge |
| Ancient Mountain 4-5 | Heart of Force Inversion | Below waypoint | Requires digging to unlock both |
The third Monetoo serves a dual purpose as it’s required to unlock a Warrior’s Challenge in the new map area. Found south of the Lava Dragon Statue Boss, a baby Tatankasaur plays with this particular flame, adding a touch of whimsy to your collection journey. Locations four and five can both be accessed from the western cliff waypoint, with the fourth situated on a straight-ahead cliff and the fifth requiring you to cross mountains to reach the map’s edge where an Ancient Glazeback Turtle stands guard.
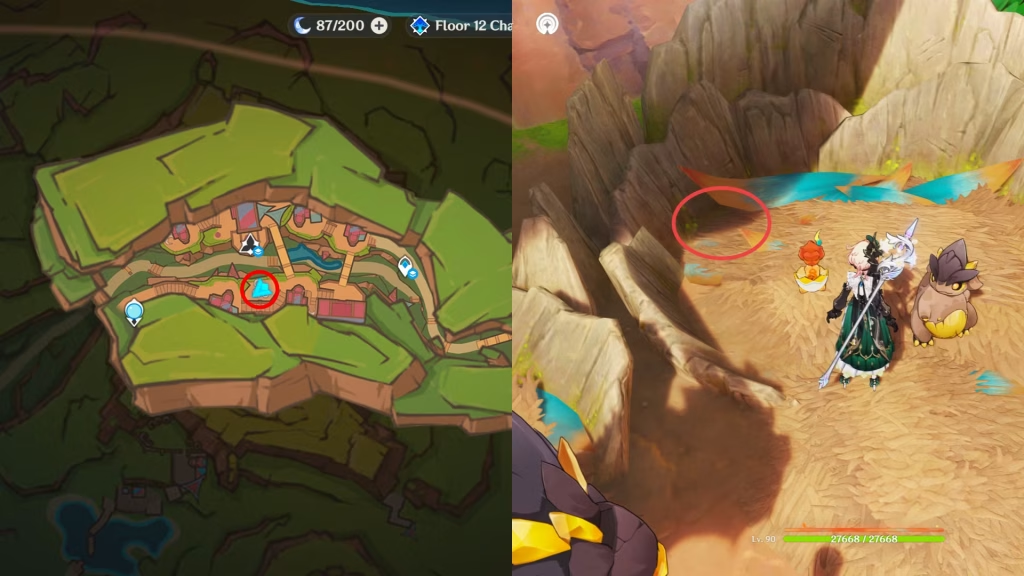
The sixth location offers a convenient landmark—simply teleport to Atocpan’s Statue of Seven, turn around, and you’ll immediately spot several Tatankasaurs circling this Monetoo. For the seventh, head to the small island waypoint, turn back, and you’ll find the flame guarded by Sauroform Tribal Warriors protecting a chest. The eighth Monetoo awaits on the beach below the new Artifact domain waypoint, while the ninth and final Atocpan location can be reached from the southern waypoint, where Hilichurls comically chase the bouncing flame.
Ancient Sacred Mountain hosts the remaining five Monetoos, with two conveniently located near the Infinitesimal Local Legend—one to the left and one to the right of the waypoint. The twelfth Monetoo requires a journey to the Ruined Armament Workshop area, where it awaits on the first section of a broken bridge, creating a picturesque scene against Natlan’s volcanic backdrop.
The final two Monetoos feature a unique unlock mechanism near the Heart of Force Inversion. After teleporting to this waypoint, drop down to find a locked Precious chest with a dig option. Activating this sends two Monetoos in opposite directions—one right, one left—requiring quick reflexes to follow and complete both puzzles for maximum rewards.
Assassin’s Creed Shadows: Complete Guide to The Path He Walks Quest
Frequently Asked Questions
Which characters are best for completing Matador Monetoo puzzles in Genshin Impact 5.5?
While Tatankasaur transformations are widely available near most Monetoo puzzles, certain characters excel at interacting with these fiery companions. Natlan’s native characters—Varesa and Iansan—possess inherent advantages due to their regional affinity and attack patterns. Iansan particularly shines with her fast attack speed and Pyro element that resonates with the Monetoos’ nature, making her interactions more responsive. For players without these specific characters, catalyst users like Yanfei or Klee offer excellent alternatives due to their ranged attacks that can easily track the moving Monetoos. Sword characters with fast attack animations such as Keqing or Ayaka also perform well in these puzzles.
The key factor is attack speed rather than damage, as Monetoos respond to hit frequency rather than damage numbers. If relying on Tatankasaur transformations, be aware that they have limited duration, so position yourself strategically before activating the transformation to maximize your puzzle-solving efficiency.
What rewards do players receive for completing all Matador Monetoo puzzles in Natlan?
Completing all fourteen Matador Monetoo puzzles yields substantial rewards beyond the immediate treasure chests. Each individual Monetoo typically rewards a Precious Chest containing 10 Primogems, 2-3 regional specialty items, and varying amounts of Mora. Collectively, completing all puzzles contributes approximately 140-160 Primogems, 30+ Natlan specialties (crucial for character ascension), and several Remarkable Chests containing exclusive Natlan-themed furniture blueprints.
Additionally, these puzzles count toward Natlan’s exploration progress percentage, helping players reach the 20%, 40%, and 80% thresholds that unlock region-specific rewards from the Reputation system. The most valuable hidden reward comes from completing the set—players receive an achievement worth 5 Primogems and unlock a special namecard featuring the Matador Monetoo design, a prestigious cosmetic that showcases exploration mastery. One Monetoo specifically (Location 3) is required to unlock a Warrior’s Challenge combat trial, which provides additional rewards and progression opportunities in the Natlan region.